Init的工作职责


总览图
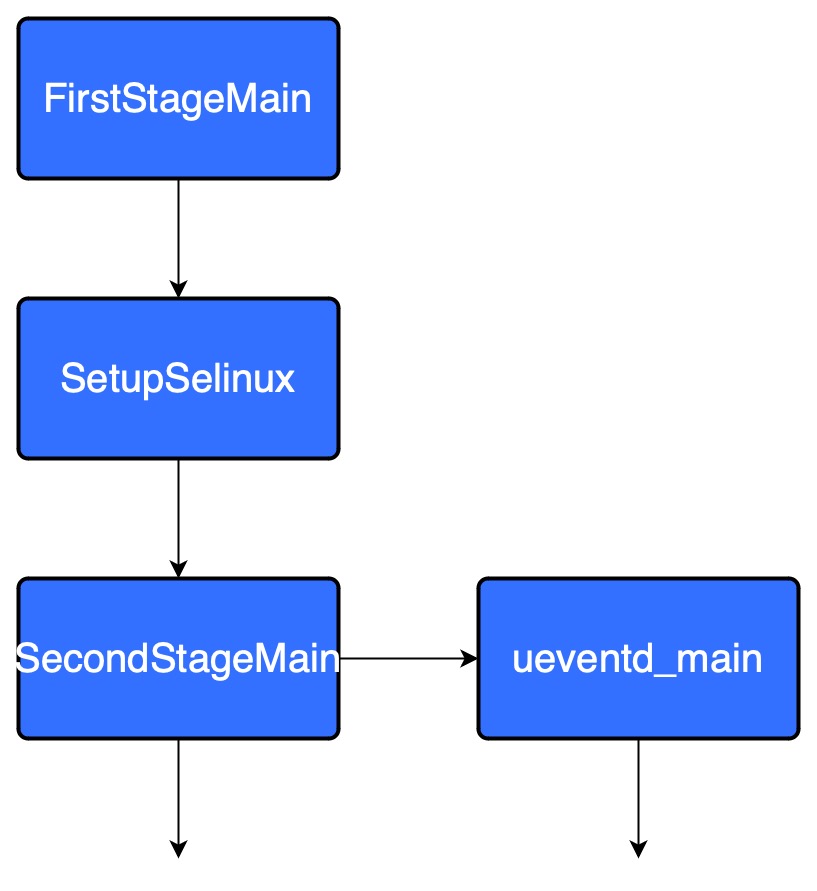
ueventd其实就是init,为了方便启动所以单独设置了一个链接


Init第二阶段初始化流程
PropertyInit
它的作用初始化属性,它在非常早期的阶段(此时没有执行init脚本指令,甚至没有初始化selinux)就会执行。
它会做下面这些操作:
- 创建/dev/__properties__节点
- 解析序列化的属性(在文件{分区名}__property_contexts中),并且写入到/dev/properties/property_info
- 解析Kernel Device Tree,设置到ro.boot.{}中
- 解析Kernel Command Line,设置到ro.boot.{}中
- 解析Boot Config,设置到ro.boot.{}中
- 将一些Kernel Boot的属性,设置出去。首先获取src_prop的属性值,然后设置到dst_prop的属性中
- 获取和设置各分区的属性,以及初始化必要的属性,这个是设置属性最多,修改也最频繁的部分。
- 它会读取各分区的build.prop或default.prop文件获取里面的属性
- 从init第二阶段的资源中获取属性
- 从ramdisk中获取debug属性
- 从厂商自定的属性文件中获取属性
- 根据各分区属性,设置动态的只读属性(比如fingerprint)
- 初始化build id属性
- ......
将一些Kernel Boot的属性,设置出去
    struct {
        const char* src_prop;
        const char* dst_prop;
        const char* default_value;
    } prop_map[] = {
            // clang-format off
        { "ro.boot.serialno",   "ro.serialno",   UNSET, },
        { "ro.boot.mode",       "ro.bootmode",   "unknown", },
        { "ro.boot.baseband",   "ro.baseband",   "unknown", },
        { "ro.boot.bootloader", "ro.bootloader", "unknown", },
        { "ro.boot.hardware",   "ro.hardware",   "unknown", },
        { "ro.boot.revision",   "ro.revision",   "0", },
            // clang-format on
    };
显示解析Kernel Device Tree、Boot Config和Kernel Command Line得到的属性
[ro.boot.avb_version]: [1.1]
[ro.boot.baseband]: [mdm]
[ro.boot.boot_devices]: [soc/1d84000.ufshc]
[ro.boot.bootdevice]: [1d84000.ufshc]
[ro.boot.bootreason]: [reboot,rescueparty]
[ro.boot.cert]: [M2105K81C]
[ro.boot.console]: [ttyMSM0]
[ro.boot.cpuid]: [0x5290083c]
[ro.boot.dp]: [0xB]
[ro.boot.dtb_idx]: [0]
[ro.boot.dtbo_idx]: [19]
[ro.boot.dynamic_partitions]: [true]
[ro.boot.flash.locked]: [0]
[ro.boot.force_normal_boot]: [1]
[ro.boot.fpsensor]: [goodix]
[ro.boot.fstab_suffix]: [default]
[ro.boot.hardware]: [qcom]
[ro.boot.hwc]: [CN]
[ro.boot.hwlevel]: [P2]
[ro.boot.hwversion]: [B.2.0]
[ro.boot.keymaster]: [1]
[ro.boot.memcg]: [1]
[ro.boot.oled_wp]: [808374]
[ro.boot.ramdump]: [disable]
[ro.boot.secureboot]: [1]
[ro.boot.serialno]: [9b12f90d]
[ro.boot.slot_suffix]: [_a]
[ro.boot.usbcontroller]: [a600000.dwc3]
[ro.boot.vbmeta.avb_version]: [1.0]
[ro.boot.vbmeta.device_state]: [unlocked]
[ro.boot.vbmeta.digest]: [284ee39262f0f591db3532b0ba3b514b6ba7a92042ca8f963c07dc26ca5f7303]
[ro.boot.vbmeta.hash_alg]: [sha256]
[ro.boot.vbmeta.invalidate_on_error]: [yes]
[ro.boot.vbmeta.size]: [7808]
[ro.boot.verifiedbootstate]: [orange]
[ro.boot.veritymode]: [enforcing]
MountExtraFilesystems
挂载额外的分区,即apex和linkerconfig分区,他们都是内存分区
SelabelInitialize
初始化selinux label
// selinux_android_file_context_handle() takes on the order of 10+ms to run, so we want to cache
// its value.  selinux_android_restorecon() also needs an sehandle for file context look up.  It
// will create and store its own copy, but selinux_android_set_sehandle() can be used to provide
// one, thus eliminating an extra call to selinux_android_file_context_handle().
void SelabelInitialize() {
    sehandle = selinux_android_file_context_handle();
    selinux_android_set_sehandle(sehandle);
}
读取文件中记录的selinux label
struct selabel_handle* selinux_android_file_context_handle(void)
{
    struct selinux_opt seopts_file[MAX_FILE_CONTEXT_SIZE];
    int size = 0;
    unsigned int i;
    for (i = 0; i < ARRAY_SIZE(seopts_file_plat); i++) {
        if (access(seopts_file_plat[i].value, R_OK) != -1) {
            seopts_file[size++] = seopts_file_plat[i];
            break;
        }
    }
    for (i = 0; i < ARRAY_SIZE(seopts_file_apex); i++) {
        if (access(seopts_file_apex[i].value, R_OK) != -1) {
            seopts_file[size++] = seopts_file_apex[i];
            break;
        }
    }
    for (i = 0; i < ARRAY_SIZE(seopts_file_system_ext); i++) {
        if (access(seopts_file_system_ext[i].value, R_OK) != -1) {
            seopts_file[size++] = seopts_file_system_ext[i];
            break;
        }
    }
    for (i = 0; i < ARRAY_SIZE(seopts_file_product); i++) {
        if (access(seopts_file_product[i].value, R_OK) != -1) {
            seopts_file[size++] = seopts_file_product[i];
            break;
        }
    }
    for (i = 0; i < ARRAY_SIZE(seopts_file_vendor); i++) {
        if (access(seopts_file_vendor[i].value, R_OK) != -1) {
            seopts_file[size++] = seopts_file_vendor[i];
            break;
        }
    }
    for (i = 0; i < ARRAY_SIZE(seopts_file_odm); i++) {
        if (access(seopts_file_odm[i].value, R_OK) != -1) {
            seopts_file[size++] = seopts_file_odm[i];
            break;
        }
    }
    return selinux_android_file_context(seopts_file, size);
}
其中find_existing_files是
static const struct selinux_opt seopts_file_plat[] = {
    { SELABEL_OPT_PATH, "/system/etc/selinux/plat_file_contexts" },
    { SELABEL_OPT_PATH, "/plat_file_contexts" }
};
static const struct selinux_opt seopts_file_apex[] = {
    { SELABEL_OPT_PATH, "/dev/selinux/apex_file_contexts" }
};
static const struct selinux_opt seopts_file_system_ext[] = {
    { SELABEL_OPT_PATH, "/system_ext/etc/selinux/system_ext_file_contexts" },
    { SELABEL_OPT_PATH, "/system_ext_file_contexts" }
};
static const struct selinux_opt seopts_file_product[] = {
    { SELABEL_OPT_PATH, "/product/etc/selinux/product_file_contexts" },
    { SELABEL_OPT_PATH, "/product_file_contexts" }
};
static const struct selinux_opt seopts_file_vendor[] = {
    { SELABEL_OPT_PATH, "/vendor/etc/selinux/vendor_file_contexts" },
    { SELABEL_OPT_PATH, "/vendor_file_contexts" }
};
static const struct selinux_opt seopts_file_odm[] = {
    { SELABEL_OPT_PATH, "/odm/etc/selinux/odm_file_contexts" },
    { SELABEL_OPT_PATH, "/odm_file_contexts" }
};
SelinuxRestoreContext
ActionManager
从名字上,就可以看出,它是处理Init下一步行动的管理者。
它具有一个事件队列event_queue_,行动队列actions_,以及一个当前正在执行的行动队列current_executing_actions_。
下面分别介绍ActionManager具备的一些方法
构建行动 - QueueBuiltinAction
void ActionManager::QueueBuiltinAction(BuiltinFunction func, const std::string& name) {
    auto lock = std::lock_guard{event_queue_lock_};
    auto action = std::make_unique<Action>(true, nullptr, "<Builtin Action>", 0, name,
                                           std::map<std::string, std::string>{});
    action->AddCommand(std::move(func), {name}, 0);

    event_queue_.emplace(action.get());
    actions_.emplace_back(std::move(action));
}
它用于构建一些额外的指令,以下面这个指令为例子
am.QueueBuiltinAction(SetupCgroupsAction, "SetupCgroups");
am.QueueBuiltinAction(SetKptrRestrictAction, "SetKptrRestrict");
am.QueueBuiltinAction(TestPerfEventSelinuxAction, "TestPerfEventSelinux");
它的作用是往事件队列中添加一个事件(Event)和其对应的行动(Action)。
am.QueueBuiltinAction(SetupCgroupsAction, "SetupCgroups");
比如上面这一条指令,它的作用是将一个SetupCgroups事件和其对应的Action分别填装到事件队列和行动队列中。
执行 - ExecuteOneCommand
执行队列中的一条指令。他会检查正在执行的行动队列是否还有需要执行的指令,如果没有指令,则会检查事件队列是否还有需要执行的Event。如果当前有Event需要执行,那么它接下来会去遍历行动队列,找到下一个事件需要执行的Action,并且将它们添加到正在执行的行动队列中。
当遍历结束后,会将这个Event出队列
CheckEvent这里,会通过CheckPropertyTriggers判断当前属性是否满足执行某些Action
    {
        auto lock = std::lock_guard{event_queue_lock_};
        // Loop through the event queue until we have an action to execute
        while (current_executing_actions_.empty() && !event_queue_.empty()) {
            for (const auto& action : actions_) {
                if (std::visit([&action](const auto& event) { return action->CheckEvent(event); },
                               event_queue_.front())) {
                    current_executing_actions_.emplace(action.get());
                }
            }
            event_queue_.pop();
        }
    }
最后会不断执行正在执行的行动队列中的Action,每次调用一次ExecuteOneCommand(Init会循环执行这个操作),都会执行当前Action中的一条指令,通过current_command_来判断当前执行到Action的第几条指令,如果一个Action中的指令都执行完毕,那么这个Action会从正在执行的行动队列中弹出,直到所有的Action都执行完毕。然后会根据下一个Event来填充之后需要执行的Action。
    if (current_executing_actions_.empty()) {
        return;
    }

    auto action = current_executing_actions_.front();

    if (current_command_ == 0) {
        std::string trigger_name = action->BuildTriggersString();
        LOG(INFO) << "processing action (" << trigger_name << ") from (" << action->filename()
                  << ":" << action->line() << ")";
    }

    action->ExecuteOneCommand(current_command_);

    // If this was the last command in the current action, then remove
    // the action from the executing list.
    // If this action was oneshot, then also remove it from actions_.
    ++current_command_;
    if (current_command_ == action->NumCommands()) {
        current_executing_actions_.pop();
        current_command_ = 0;
        if (action->oneshot()) {
            auto eraser = [&action](std::unique_ptr<Action>& a) { return a.get() == action; };
            actions_.erase(std::remove_if(actions_.begin(), actions_.end(), eraser),
                           actions_.end());
        }
    }
属性条件检查 - CheckPropertyTriggers
既然这个方法与是否满足某个属性值有关,那么我们来看看它的逻辑吧。
在调用CheckEvent的时候,有以下三种情况。
- 事件触发 - 此时Event的内容是一个String字符串
- 属性触发 - 此时Event的内容是一个Pair对,保存着变化属性的key、value
- 构建行为触发 - 此时Event的内容就是一个Action
std::visit的作用就是为了让第二个参数自动匹配重载方法(第一个参数是具有多个重载方法的函数名)
bool Action::CheckEvent(const EventTrigger& event_trigger) const {
    return event_trigger == event_trigger_ && CheckPropertyTriggers();
}

bool Action::CheckEvent(const PropertyChange& property_change) const {
    const auto& [name, value] = property_change;
    return event_trigger_.empty() && CheckPropertyTriggers(name, value);
}

bool Action::CheckEvent(const BuiltinAction& builtin_action) const {
    return this == builtin_action;
}
之后让我们看看它的属性判断方式,其实就是判断传入的属性键值是否存在而已。
// This function checks that all property triggers are satisfied, that is
// for each (name, value) in property_triggers_, check that the current
// value of the property 'name' == value.
//
// It takes an optional (name, value) pair, which if provided must
// be present in property_triggers_; it skips the check of the current
// property value for this pair.
bool Action::CheckPropertyTriggers(const std::string& name = "", const std::string& value = "") const {
    if (property_triggers_.empty()) {
        return true;
    }

    if (!name.empty()) {
        auto it = property_triggers_.find(name);
        if (it == property_triggers_.end()) {
            return false;
        }
        const auto& trigger_value = it->second;
        if (trigger_value != "*" && trigger_value != value) {
            return false;
        }
    }

    for (const auto& [trigger_name, trigger_value] : property_triggers_) {
        if (trigger_name != name) {
            std::string prop_value = android::base::GetProperty(trigger_name, "");
            if (trigger_value == "*" && !prop_value.empty()) {
                continue;
            }
            if (trigger_value != prop_value) return false;
        }
    }
    return true;
}
如果值使用了*,并且属性值不为空,则返回true,即该属性存在即可触发。
例如:
on property:ro.build.ab_update=*
    mkdir /mnt/rescue/mqsas 0775 root system
上面这个只要ro.build.ab_update属性存在,就会执行创建mqsas文件夹的逻辑。
PropertyService
它是属性服务,最重要的职责就是处理设置属性的事件。我们在深入了解PropertyService之后,就能明白属性有着各种各样的类别与作用,有的属性是控制属性,有的属性是动态生成的。
当然,PropertyService是由init通过执行StartPropertyService启动的。
我们不会花大量篇幅来讲述PropertyService是如何工作的,只会讲述其中一些重要的方法
Init观察属性变化 - PropertyChanged
调用链:StartPropertyService -> [PropertyServiceThread](此处会堵塞等待消息) -> handle_property_set_fd -> HandlePropertySet -> PropertySet -> PropertyChanged
Init中存在一个PropertyChanged方法,当PropertyService进行属性修改时,会通过PropertyChanged方法通知init,当前有属性发生了变更。
void PropertyChanged(const std::string& name, const std::string& value) {
    // If the property is sys.powerctl, we bypass the event queue and immediately handle it.
    // This is to ensure that init will always and immediately shutdown/reboot, regardless of
    // if there are other pending events to process or if init is waiting on an exec service or
    // waiting on a property.
    // In non-thermal-shutdown case, 'shutdown' trigger will be fired to let device specific
    // commands to be executed.
    if (name == "sys.powerctl") {
        trigger_shutdown(value);
    }

    if (property_triggers_enabled) {
        ActionManager::GetInstance().QueuePropertyChange(name, value);
        WakeMainInitThread();
    }

    prop_waiter_state.CheckAndResetWait(name, value);
}
PropertyChanged做的事情非常简单,只做三个事情
- 当接收到传递了sys.powerctl属性时,会调用ShutdownState来执行相关的事件,一般是处理重启、关机等操作
- 当Init开始启用属性变更检查时(时机是在late-init之后,由property_triggers_enabled变量进行控制),会将变化的属性键值添加到事件队列中,唤醒init进行处理
- 如果此前设置了需要等待某个属性,当前改变的属性正好匹配,就会唤醒init进行处理
LoadBootScripts
这个方法是Init中最重要的方法之一,它的作用是从init的脚本文件中加载事件和对应的行动。
static void LoadBootScripts(ActionManager& action_manager, ServiceList& service_list) {
    Parser parser = CreateParser(action_manager, service_list);

    std::string bootscript = GetProperty("ro.boot.init_rc", "");
    if (bootscript.empty()) {
        parser.ParseConfig("/system/etc/init/hw/init.rc");
        if (!parser.ParseConfig("/system/etc/init")) {
            late_import_paths.emplace_back("/system/etc/init");
        }
        // late_import is available only in Q and earlier release. As we don't
        // have system_ext in those versions, skip late_import for system_ext.
        parser.ParseConfig("/system_ext/etc/init");
        if (!parser.ParseConfig("/vendor/etc/init")) {
            late_import_paths.emplace_back("/vendor/etc/init");
        }
        if (!parser.ParseConfig("/odm/etc/init")) {
            late_import_paths.emplace_back("/odm/etc/init");
        }
        if (!parser.ParseConfig("/product/etc/init")) {
            late_import_paths.emplace_back("/product/etc/init");
        }
    } else {
        parser.ParseConfig(bootscript);
    }
}
Parser在通过ParseConfig解析路径时,会通过判断该路径是文件还是文件夹。
- 如果是文件,那么Parser会直接解析这个文件
- 如果是文件夹,那么Parser会遍历这个文件夹(子文件夹不会被遍历),将所有的文件加入到解析列表中
ParseConfigFile
接下来,我们分析一下解析文件的方法
bool Parser::ParseConfigFile(const std::string& path) {
    LOG(INFO) << "Parsing file " << path << "...";
    android::base::Timer t;
    auto config_contents = ReadFile(path);
    if (!config_contents.ok()) {
        LOG(INFO) << "Unable to read config file '" << path << "': " << config_contents.error();
        return false;
    }

    ParseData(path, &config_contents.value());

    LOG(VERBOSE) << "(Parsing " << path << " took " << t << ".)";
    return true;
}
首先,他会读取脚本文件中所有的数据,转换成string。
然后通过ParseData进行解析
- 通过ParseSection解析新的Action段落。在解析的时候,会将需要判断的属性都解析出来,形成一个属性向量,和Event放在一个Action中
- 通过ParseLineSection解析当前Action需要的指令,然后将它添加到当前的Action中(通过ParseSection解析出来的Action)
- 最后通过EndSection将封装好的Action放入ActionManager中的行动队列中
总而言之,init解析脚本,是按照顺序进行解析和入队列的。
举个例子
on late-init
    setprop sys.ota.type recovery

on late-init && property:ro.build.ab_update=true
    setprop sys.ota.type update_engine
这里最终会生成两个Action
- Action1 (event_trigger : late-init)
- Action2 (event_trigger : late-init, property_triggers: {ro.build.ab_update = true})
由于Action1会先进入行动队列,因此后续这两个Action在都满足条件的情况下,init循环中会先执行Action1,然后再执行Action2。
init脚本指令的顺序,会影响到init执行指令的顺序。也就是说,同时满足触发条件的执行指令,它会按照从上到下的顺序执行。